Painting projects can be daunting, expensive, and time-consuming. But with the right tools and knowledge, it doesn’t have to be. Using a paint sprayer can make painting much easier and faster, and can help you achieve beautiful results with less effort.
In this blog post, we’ll explore how to use a paint sprayer, from choosing the right one for your project to the tips and tricks for successful painting.
How to Choose a Paint Sprayer
Paint Sprayers

There are several types of paint sprayers available on the market. The most common types are:
- Airless Paint Sprayer – powered by an electric motor and uses high-pressure air to atomize the paint. Airless sprayers are ideal for painting large areas and can achieve a smooth, even finish.
- HVLP (high-volume low-pressure) Sprayers – another popular option and are perfect for smaller projects. HVLP sprayers use a low-pressure air stream to atomize the paint, resulting in a finer finish.
The Different Paint Sprayer Tips
Choosing the right paint sprayer for your project is essential. Consider the size of the project, the paint you’ll be using, and the surface you’ll be painting. You’ll also need to choose the right tip size for your project.
Spray paint tips come in different sizes, each with a unique purpose. The size of the spray tip you choose will determine the amount of coverage, the type of finish, and the amount of overspray you will get. Here is a list of the most commonly used spray paint tips and what they are used for:
- Fine Finish Tips – These are the smallest spray paint tips, typically ranging from 0.5 to 1.5 mm in size. Fine Finish Tips are ideal for producing a very thin, even coat of paint and are great for small projects and intricate details.
- Medium Finish Tips – Medium Finish Tips are a bit larger than Fine Finish Tips, usually ranging from 1.5 to 2.5 mm in size. They are perfect for larger projects and provide a more even coat of paint.
- Heavy Finish Tips – Heavy Finish Tips are the largest spray paint tips, usually ranging from 2.5 to 3.5 mm in size. They produce a thicker, more even coat of paint and are great for larger projects.
Benefits of Painting with a Paint Sprayer
Paint sprayers are fast and efficient, allowing you to cover a large area in a short amount of time. They also provide a smooth, even finish with minimal effort. Paint sprayers are also great for painting in hard-to-reach areas and can help you achieve a professional finish. In addition, paint sprayers are relatively affordable and can save you time and money.
A Step-by-Step Guide on How to Use a Paint Sprayer
After choosing the right paint sprayer for your project, here are the necessary steps you should take for that perfect paint finish you have wanted all along!
Step 1: Gather Your Supplies

Gathering the necessary supplies for your paint job is an important first step. Start by getting a paint sprayer that best suits your needs. When choosing a paint sprayer, consider the size of the job, the type of surface you’ll be painting, and the paint you’ll be using. Once you have your paint sprayer, gather the other supplies, including:
- Drop cloth or tarp to protect the floor
- Painter’s tape to protect any areas you don’t want to paint
- Ladder or stepladder to reach higher areas
- Painter’s plastic to cover furniture
- Brush to help you get into tight spaces
- Paint tray to hold your paint
Ensure you have all of these supplies ready to go before you begin.
Step 2: Prepare the Area
How to use a paint sprayer indoors? When preparing an area for a paint job, it is crucial to take the necessary precautions to ensure that the job is completed to a high standard. Start by laying a drop cloth or tarp on the ground or across furniture and other items you don’t want to get paint on. This will protect the surface from any unwanted paint mess.
Next, use painter’s tape to mask off areas you want to avoid spraying, such as windows and door frames. The painter’s tape will create a sharp, crisp line around these areas, helping to ensure that the paint job looks professional and well done.
Once the area is masked off, you can start prepping the walls. Begin by removing any dust, dirt, or debris from the walls. This can be done using a damp cloth and some mild soap. Once the walls are clean and dry, you can use a putty knife to fill any cracks or holes in the wall. This will create a smoother surface for the paint and help to ensure a seamless finish.
Finally, lightly sand the walls to smooth out any imperfections further. Once these steps have been completed, you can start using your paint sprayer.
Step 3: Fill the Paint Sprayer
Filling a paint sprayer with the paint of your choice is an important step in the painting process. Before filling the sprayer, read the manufacturer’s instructions for proper usage. Also, ensure that the paint is the correct type and consistency for the sprayer. Using the wrong paint consistency can result in clogging or poor performance of the sprayer.
First, ensure that the sprayer is properly cleaned and all residue from previous projects is removed to fill the paint sprayer. Once the sprayer is clean, pour the paint into the sprayer’s reservoir. It is essential to do this slowly, as too much paint in the reservoir at once can cause the sprayer to become clogged.
When you have filled the reservoir, it is time to connect the hose to the sprayer. Ensure the connection is secure and there are no leaks before beginning the painting process.
Step 4: Adjust the Settings and Test the Spray Pattern

Once the sprayer is filled and connected correctly, it is time to test it. Turn the sprayer on and use the pressure settings to adjust the stream of paint. Ensure the paint comes out in an even stream and the pressure is not too high or too low. If the sprayer is functioning correctly, it is now ready to use.
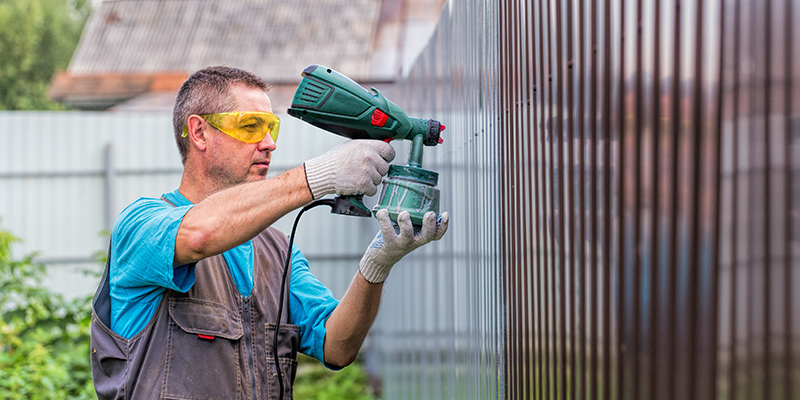
Step 5: Start Spraying
This is the most important step and must be done correctly to get the best finish. Start by holding the spray gun about 8-10 inches from the surface and begin spraying the paint slowly and steadily. Make sure to overlap each stroke slightly to get an even coat. You may need to adjust the gun’s pressure to get the right paint consistency.
If the paint is too thick, you can thin it out with a bit of water. Additionally, you’ll want to use a fanning technique when you spray, which means you fan the paint out as you move the gun across the surface. This will get a more even coat.
Step 6: Let the Paint Dry
It is essential to allow the paint to dry completely before proceeding to the next step. This drying process can take anywhere from 24 to 36 hours, depending on the type of paint you are using, the humidity and temperature in the area, and the thickness of the paint.
For the best results, keep the area well-ventilated while the paint is drying, enabling the paint to dry evenly and thoroughly. You should also avoid any contact with the paint while it is drying, as this can disrupt the drying process or cause the paint to become uneven. If you need to move around the area while the paint is drying, wear protective gear and take extra care to avoid contact with the paint.
Step 7: Apply a Second Coat

Once the first coat of paint has dried, it’s time to apply a second coat. To ensure that the paint job is even and looks its best, use the same spraying method you used for the first coat. If you applied the paint in a horizontal motion, use the same motion for the second coat. The same applies if you use a vertical or circular motion.
When applying the second coat, overlap the first coat by about 50%. This will ensure that the paint is applied evenly and that the color is consistent throughout. To ensure the best results, use the same paint and brand you used for the first coat. This way the color will be consistent throughout. After the second coat has dried, you should have a nice, even paint job.
Step 8: Clean the Paint Sprayer
Cleaning and maintaining your paint sprayer is essential to ensure it performs at its best. After each use, be sure to clean the sprayer thoroughly.
Start by running clean water through the sprayer to flush out any remaining paint. Then, disassemble the sprayer and clean each part with a mild detergent. Allow the parts to dry completely before reassembling the sprayer. Regular cleaning and maintenance will help keep your paint sprayer in top condition.
Is A Paint Sprayer Worth the Money?
Investing in a paint sprayer is money well spent for any major or minor painting or decorating job around the house. A paint sprayer makes a smooth, even finish faster than a brush or roller. Paint sprayers also reduce the amount of paint wasted, as they can atomize the paint more finely and evenly, so less is used.
We hope this article helps you operate a paint sprayer and encourages you to finish your next painting project beautifully. You can achieve your desired finish with the correct equipment, education, and practice!
You Can Also Read These:
- How To Do DIY Plywood Flooring
- Blinds VS Curtains: Which One Is Best For Your Home?
- 11 Entryway Decor Ideas To Give Your Home A Warm Welcome